Submit a Helpdesk Ticket from the Dashboard
*** NOTE - If you do not have Dashboard access you can email us directly at content@schoolinfoapp.com to submit a Helpdesk Ticket.***
In order to facilitate a quick turnaround for your issue please try to include the following information while submitting your helpdesk ticket:
1: Screenshots or screen recordings of any errors you experienced (if you can reproduce the issue, sometimes error screens are hard to capture and that's understandable)
2: If multiple users are experiencing the issue a list of names should be provided.
3: A timeline of when the issue was first experienced.
Step 1: Click on "Home" on your Dashboard
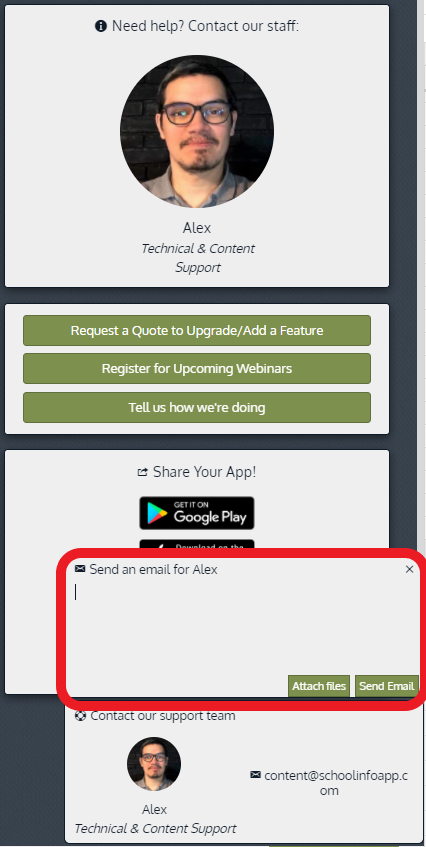
Step 2: Click on the picture of the technician in the upper right-hand corner of the page.
Step 3: Two bubbles will populate in the bottom of the page granting you 2 ways to submit your question edit.
Step 4.1: The top bubble will allow you to type into it directly and attach any necessary files. click "Send email" when you're ready.

Step 4.2: The bottom bubble opens up your default mail application on your device to email us directly from it. This sends an email to content@schoolinfoapp.com & automatically generates a ticket in our system.
Congratulations, you've successfully submitted a Helpdesk ticket! One of our Customer Success technicians will reach out to you shortly.
Related Articles
Approve New Users in Dashboard
Objective Outline the steps to approve new registered users in the Dashboard If your school does not have Approval for Registered users turned on this will not apply to your school Approve New Users Navigate to "People" in the Dashboard while logged ...Creating a New Conversation on the Dashboard
From the Dashboard Home menu, select "Conversations" and then click "+New" Then title the conversation and select the participants (If you do not see the name of the participant you are looking for search for their name in the search bar) Click ...Creating, Joining, or Ending Conversations from the Dashboard
Objective To explain how to create, join, and end conversations on the Dashboard Create To create a conversation from the Dashboard, select 'Conversations' in the Dashboard Menu Select '+ New' Enter Title and you have the choice to make the ...Info Page
Objective How to Add, Edit, and Delete Info Pages and Info Page Folders from the Dashboard Add an Info Page Select "Features" from the Home menu Select "Info Page" Click "+New" Enter a Name Select a picture from the Library Describe your Info Page in ...Editing a Picture
Objective To explain how to edit a "Picture" in the Dashboard Feature 'Pictures' Navigate to the "Features" section of the Menu and select "Pictures" Select the "Edit" pencil icon to the right of the picture you would like to edit The "Edit Picture" ...